
To overcome the chicken-or-egg problem for DNSSEC (“I don’t need a DNSSEC validating resolver if there are no signed zones”), let’s install the DNS server Unbound on a Raspberry Pi for home usage. Up then, domain names are DNSSEC validated. I am listing the commands to install Unbound on a Raspberry Pi as well as some further commands to test and troubleshoot it. Finally, I am showing a few Wireshark screenshots from a sample iterative DNS capture. Here we go:
It is really simple to operate an Unbound DNS resolver locally on a Raspberry Pi. Merely an installation and some config changes. That’s it. The Unbound package on a Raspbian Linux of Unbound validates DNSSEC by default. Great!

Installation
I am using an “old” Raspberry Pi 1 Model B with Raspbian GNU/Linux 7 (wheezy) and kernel 4.1.13+. The version of Unbound which comes with this OS is not the newest one (1.4.17-3+deb7u2), but it fits. The installation is really simple:
|
1 2 |
sudo apt-get update sudo apt-get install unbound |
The Unbound server starts automatically. Have look at the listening ports with:
|
1 2 3 4 5 6 7 |
pi@jw-pi01 ~ $ sudo netstat -tulpen | grep unbound tcp 0 0 127.0.0.1:53 0.0.0.0:* LISTEN 0 7312680 27897/unbound tcp 0 0 127.0.0.1:8953 0.0.0.0:* LISTEN 0 7312684 27897/unbound tcp6 0 0 ::1:53 :::* LISTEN 0 7312676 27897/unbound tcp6 0 0 ::1:8953 :::* LISTEN 0 7312682 27897/unbound udp 0 0 127.0.0.1:53 0.0.0.0:* 0 7312678 27897/unbound udp6 0 0 ::1:53 :::* 0 7312674 27897/unbound |
Unbound works out of the box for queries from the localhost. In order to allow queries from any host, the configuration file must be edited. It is stored at /etc/unbound/unbound.conf . Note that the config has already DNSSEC validation enabled!
|
1 2 3 4 5 6 7 8 9 10 11 12 |
pi@jw-pi01 /etc/unbound $ cat unbound.conf # Unbound configuration file for Debian. # # See the unbound.conf(5) man page. # # See /usr/share/doc/unbound/examples/unbound.conf for a commented # reference config file. server: # The following line will configure unbound to perform cryptographic # DNSSEC validation using the root trust anchor. auto-trust-anchor-file: "/var/lib/unbound/root.key" |
Now, to allow queries add the following lines within the “server:” paragraph:
|
1 2 3 4 |
interface: 0.0.0.0 interface: ::0 access-control: 0.0.0.0/0 allow access-control: ::0/0 allow |
check the config:
|
1 2 |
pi@jw-pi01 ~ $ unbound-checkconf unbound-checkconf: no errors in /etc/unbound/unbound.conf |
and restart the server:
|
1 2 |
pi@jw-pi01 ~ $ sudo service unbound restart [ ok ] Restarting recursive DNS server: unbound. |
That’s it! To see a list of all configuration options click here. If you only wanted to install Unbound you’re already done!
-> The following information are only for further analysis etc.
Root Hints & Root Key
Unbound uses a list of the root servers as well as the root dnskey for its DNSSEC validation. Both should be updated regularly to avoid DNS problems in case of real root server changes. To update and use the root-hints file (for the list of root-servers), download the official list:
|
1 |
sudo curl -o /etc/unbound/root.hints https://www.internic.net/domain/named.root |
and use it within the unbound.conf configuration file:
|
1 |
root-hints: "/etc/unbound/root.hints" |
To update the root.key, use the simple “unbound-anchor” program which downloads the root.key file into /etc/unbound/:
|
1 |
sudo unbound-anchor |
And change the auto-trust-anchor-file within the unbound.conf from the default to:
|
1 |
auto-trust-anchor-file: "/etc/unbound/root.key" |
Restart Unbound: sudo service unbound restart .
Done. Click here for more information about the root.hints etc. You SHOULD update the root.hints and root.key files on a regular basis to not run into trouble!

Tests & Status
Here’s a basic test from another Linux machine that queries the Unbound server. Note the ad flag in line 8 which indicates the DNSSEC validation:
|
1 2 3 4 5 6 7 8 9 10 11 12 13 14 15 16 17 18 19 20 21 |
pi@ntp1:~ $ dig @192.168.7.5 weberdns.de +noadditional +noauthority ; <<>> DiG 9.9.5-9+deb8u6-Raspbian <<>> @192.168.7.5 weberdns.de +noadditional +noauthority ; (1 server found) ;; global options: +cmd ;; Got answer: ;; ->>HEADER<<- opcode: QUERY, status: NOERROR, id: 43402 ;; flags: qr rd ra ad; QUERY: 1, ANSWER: 1, AUTHORITY: 3, ADDITIONAL: 5 ;; OPT PSEUDOSECTION: ; EDNS: version: 0, flags:; udp: 4096 ;; QUESTION SECTION: ;weberdns.de. IN A ;; ANSWER SECTION: weberdns.de. 3600 IN A 80.154.108.230 ;; Query time: 19 msec ;; SERVER: 192.168.7.5#53(192.168.7.5) ;; WHEN: Thu Jun 09 17:23:21 CEST 2016 ;; MSG SIZE rcvd: 186 |
Of course, a failure in DNSSEC leads to a SERVFAIL (line 7) without any answer:
|
1 2 3 4 5 6 7 8 9 10 11 12 13 14 15 16 17 18 |
pi@ntp1:~ $ dig @192.168.7.5 fail03.dnssec.works ; <<>> DiG 9.9.5-9+deb8u6-Raspbian <<>> @192.168.7.5 fail03.dnssec.works ; (1 server found) ;; global options: +cmd ;; Got answer: ;; ->>HEADER<<- opcode: QUERY, status: SERVFAIL, id: 42531 ;; flags: qr rd ra; QUERY: 1, ANSWER: 0, AUTHORITY: 0, ADDITIONAL: 1 ;; OPT PSEUDOSECTION: ; EDNS: version: 0, flags:; udp: 4096 ;; QUESTION SECTION: ;fail03.dnssec.works. IN A ;; Query time: 111 msec ;; SERVER: 192.168.7.5#53(192.168.7.5) ;; WHEN: Thu Jun 09 17:24:25 CEST 2016 ;; MSG SIZE rcvd: 48 |
Good.
In order to view the status of Unbound, use the following commands: unbound-control status and unbound-control stats_noreset :
|
1 2 3 4 5 6 7 8 9 10 11 12 13 14 15 16 17 18 19 20 21 22 23 24 25 26 27 28 29 30 31 32 33 34 35 36 37 |
pi@jw-pi01 ~ $ sudo unbound-control status version: 1.4.17 verbosity: 1 threads: 1 modules: 2 [ validator iterator ] uptime: 11744 seconds unbound (pid 28021) is running... pi@jw-pi01 ~ $ sudo unbound-control stats_noreset thread0.num.queries=120 thread0.num.cachehits=18 thread0.num.cachemiss=102 thread0.num.prefetch=0 thread0.num.recursivereplies=102 thread0.requestlist.avg=0.54902 thread0.requestlist.max=18 thread0.requestlist.overwritten=0 thread0.requestlist.exceeded=0 thread0.requestlist.current.all=0 thread0.requestlist.current.user=0 thread0.recursion.time.avg=0.201798 thread0.recursion.time.median=0.17367 total.num.queries=120 total.num.cachehits=18 total.num.cachemiss=102 total.num.prefetch=0 total.num.recursivereplies=102 total.requestlist.avg=0.54902 total.requestlist.max=18 total.requestlist.overwritten=0 total.requestlist.exceeded=0 total.requestlist.current.all=0 total.requestlist.current.user=0 total.recursion.time.avg=0.201798 total.recursion.time.median=0.17367 time.now=1465816919.018412 time.up=460.981236 time.elapsed=460.981236 |
To list the current values of options, e.g. the default values, use unbound-checkconf with the “-o parameter” option, such as:
|
1 2 3 4 5 6 7 8 9 10 11 12 |
pi@jw-pi01 ~ $ sudo unbound-checkconf -o use-syslog yes pi@jw-pi01 ~ $ sudo unbound-checkconf -o verbosity 1 pi@jw-pi01 ~ $ sudo unbound-checkconf -o do-ip6 yes pi@jw-pi01 ~ $ sudo unbound-checkconf -o do-ip4 yes pi@jw-pi01 ~ $ sudo unbound-checkconf -o do-udp yes pi@jw-pi01 ~ $ sudo unbound-checkconf -o do-tcp yes |
To dump the cache for further investigations, use this:
|
1 2 |
pi@jw-pi01 ~ $ sudo unbound-control dump_cache | less pi@jw-pi01 ~ $ sudo unbound-control dump_cache | grep webernetz.net |
Per default, the log messages are sent to syslog. That is, they are stored in the default /var/log/syslog file which can be followed with:
|
1 |
pi@jw-pi01 ~ $ tail -f /var/log/syslog | grep unbound |
To increase the verbosity level, add/change the verbosity line in the unbound.conf file. The default is “1”. A level of “2” already logs every DNS request. Use it for troubleshooting but be careful with it!
|
1 |
verbosity: 2 |
All other details about the Unbound options are listed here.
DNS Server on LAN
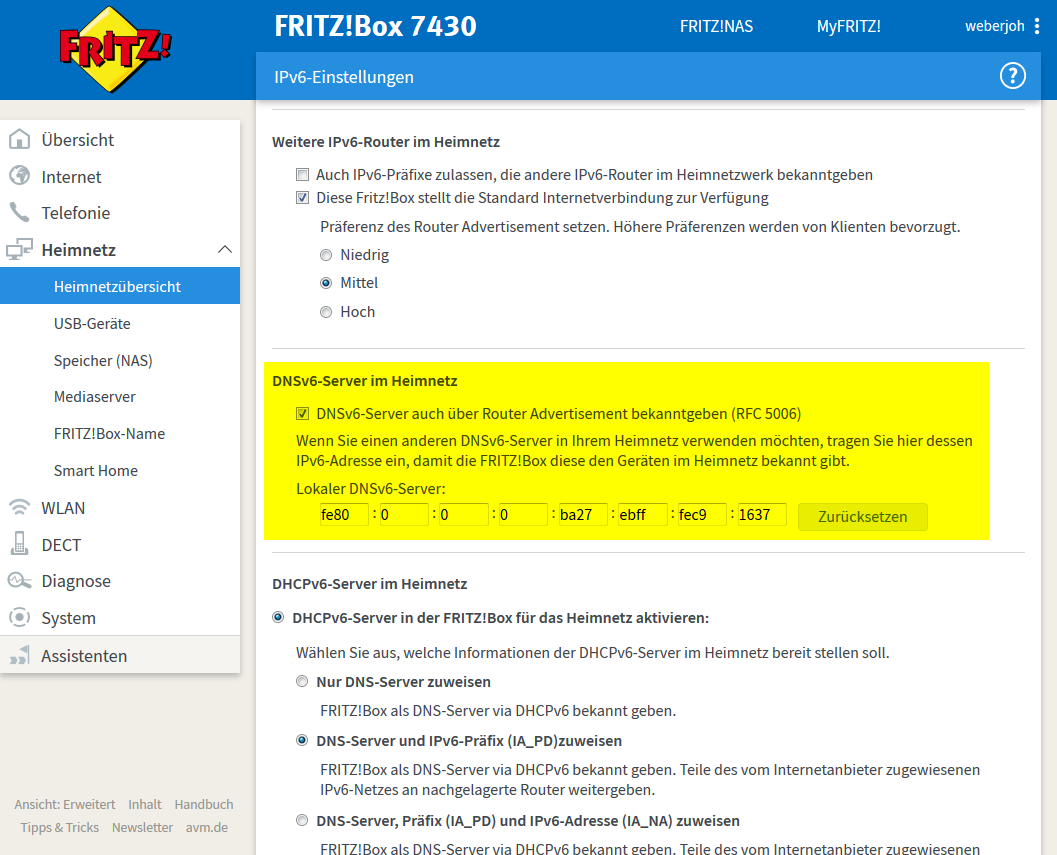
To use this Unbound DNS server for all clients in the LAN, it must be announced via DHCP as the DNS server. In my home network I have an AVM FRITZ!Box router which connects to the Internet via FTTH. The settings are as follows. I am using the static IPv4 address as well as the link-local IPv6 address as the DNS server address:

Tested from another Raspberry Pi, this leads to the following resolv.conf entries:
|
1 2 3 4 5 |
pi@ntp1:~ $ cat /etc/resolv.conf # Generated by resolvconf domain fritz.box nameserver 192.168.7.5 nameserver fe80::ba27:ebff:fec9:1637%eth0 |
This is a test from a Linux client. Once more, note the “ad” flag in line 7:
|
1 2 3 4 5 6 7 8 9 10 11 12 13 14 15 16 17 18 19 20 |
pi@ntp1:~ $ dig pa.weberdns.de +noadditional +noauthority ; <<>> DiG 9.9.5-9+deb8u6-Raspbian <<>> pa.weberdns.de +noadditional +noauthority ;; global options: +cmd ;; Got answer: ;; ->>HEADER<<- opcode: QUERY, status: NOERROR, id: 58151 ;; flags: qr rd ra ad; QUERY: 1, ANSWER: 1, AUTHORITY: 3, ADDITIONAL: 5 ;; OPT PSEUDOSECTION: ; EDNS: version: 0, flags:; udp: 4096 ;; QUESTION SECTION: ;pa.weberdns.de. IN A ;; ANSWER SECTION: pa.weberdns.de. 3592 IN A 80.154.108.228 ;; Query time: 10 msec ;; SERVER: 192.168.7.5#53(192.168.7.5) ;; WHEN: Thu Jun 09 16:45:47 CEST 2016 ;; MSG SIZE rcvd: 189 |
However, there are problems when querying the IPv6 address via the “-6” switch:
|
1 2 3 4 5 |
pi@ntp1:~ $ dig -6 dnssec.works ; <<>> DiG 9.9.5-9+deb8u6-Raspbian <<>> -6 dnssec.works ;; global options: +cmd ;; connection timed out; no servers could be reached |
But it works when the link-local IPv6 address is specified (with the %eth0 interface suffix) directly:
|
1 2 3 4 5 6 7 8 9 10 11 12 13 14 15 16 17 18 19 20 21 |
pi@ntp1:~ $ dig @fe80::ba27:ebff:fec9:1637%eth0 dnssec.works +noadditional +noauthority ; <<>> DiG 9.9.5-9+deb8u6-Raspbian <<>> @fe80::ba27:ebff:fec9:1637%eth0 dnssec.works +noadditional +noauthority ; (1 server found) ;; global options: +cmd ;; Got answer: ;; ->>HEADER<<- opcode: QUERY, status: NOERROR, id: 48062 ;; flags: qr rd ra ad; QUERY: 1, ANSWER: 1, AUTHORITY: 2, ADDITIONAL: 1 ;; OPT PSEUDOSECTION: ; EDNS: version: 0, flags:; udp: 4096 ;; QUESTION SECTION: ;dnssec.works. IN A ;; ANSWER SECTION: dnssec.works. 3600 IN A 5.45.109.212 ;; Query time: 71 msec ;; SERVER: fe80::ba27:ebff:fec9:1637%2#53(fe80::ba27:ebff:fec9:1637%2) ;; WHEN: Thu Jun 09 16:48:44 CEST 2016 ;; MSG SIZE rcvd: 113 |
So maybe it’s not a good idea to use the link-local address for the DNS server. Maybe I will disable the “IPv6 DNS Server” option in my home network since the availability of a legacy IP DNS server perfectly fits for dual-stacked clients.
And a web browser GUI test to http://dnssec.vs.uni-due.de looks like that:
 Great!
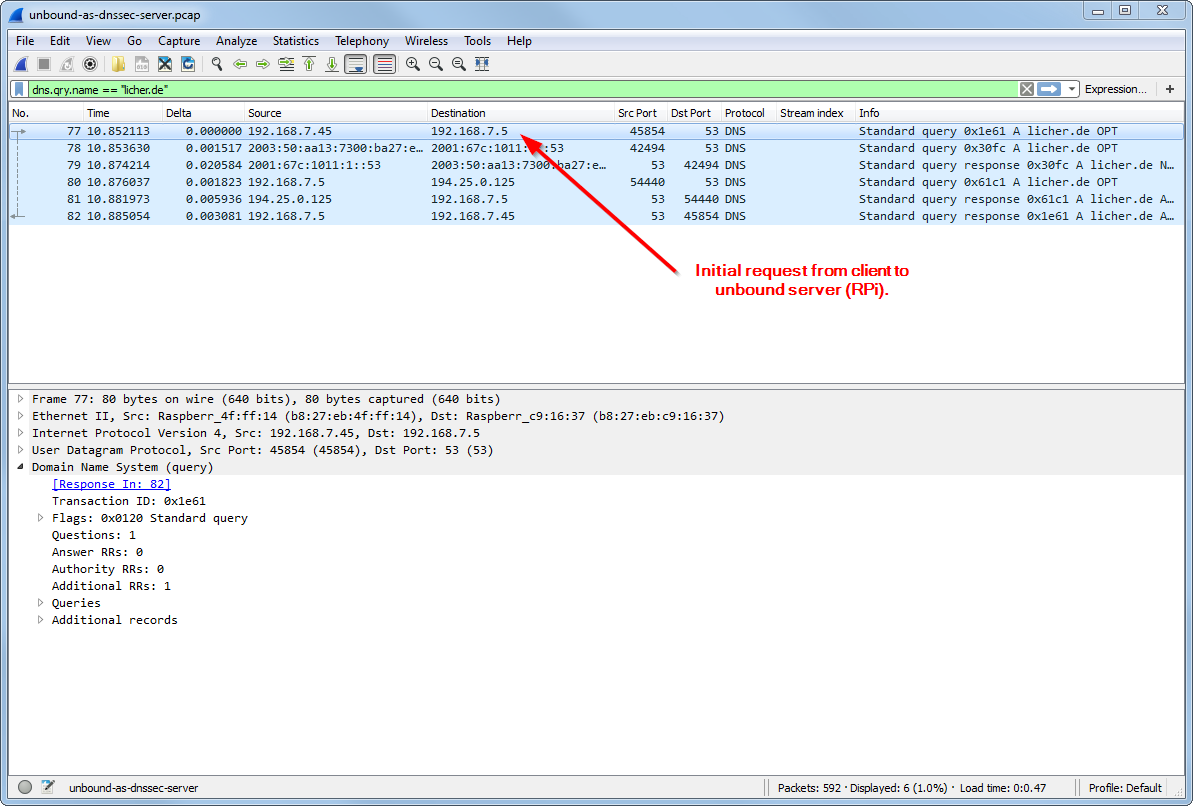
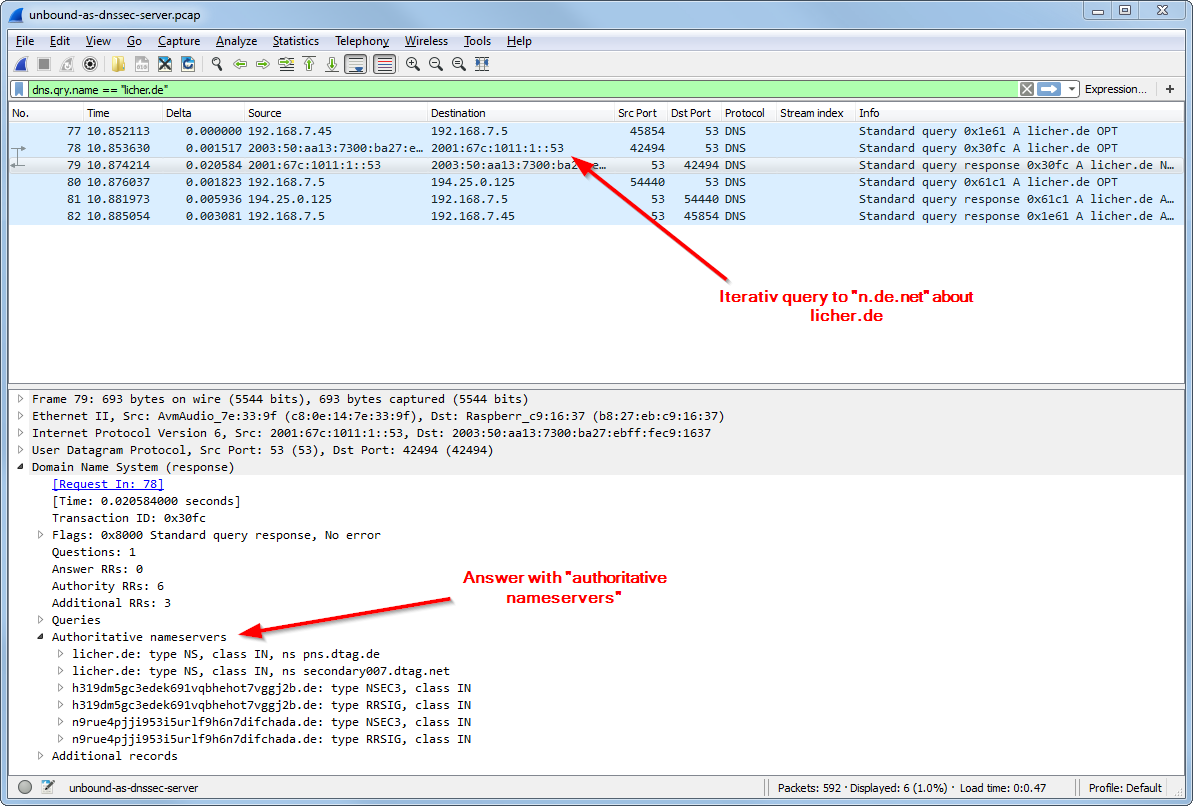
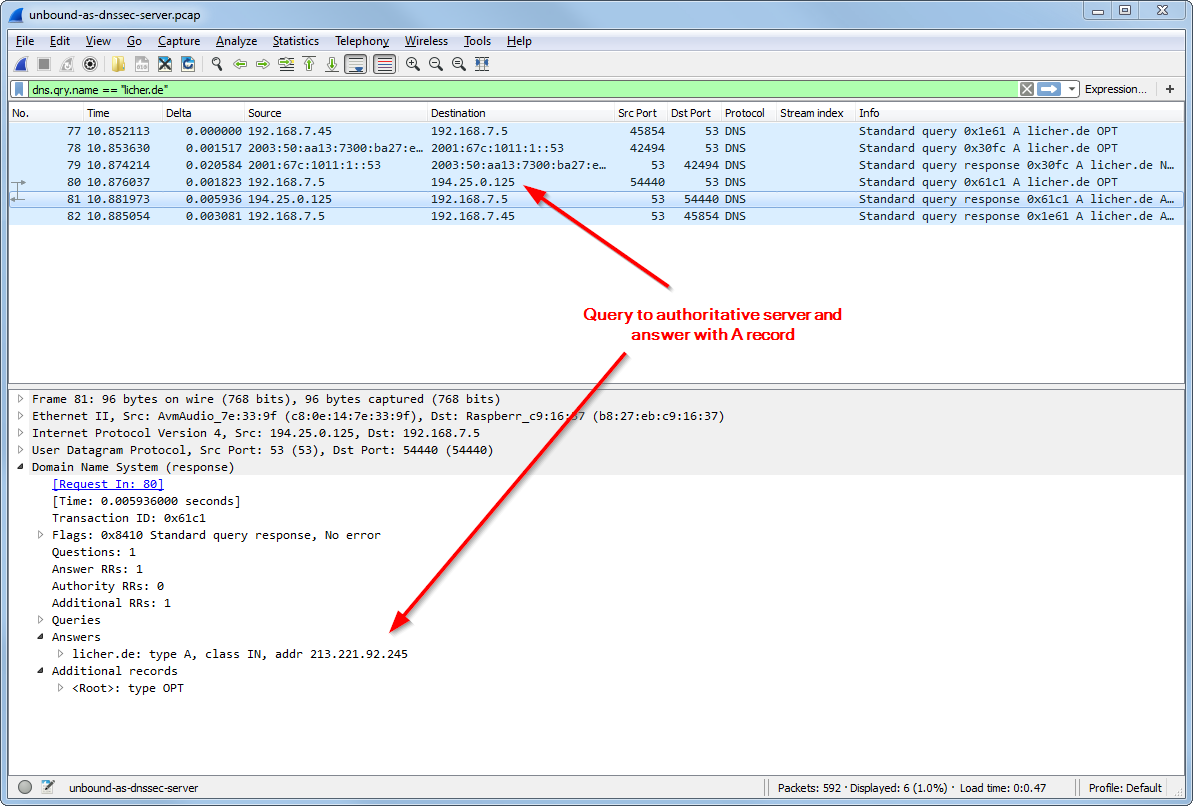
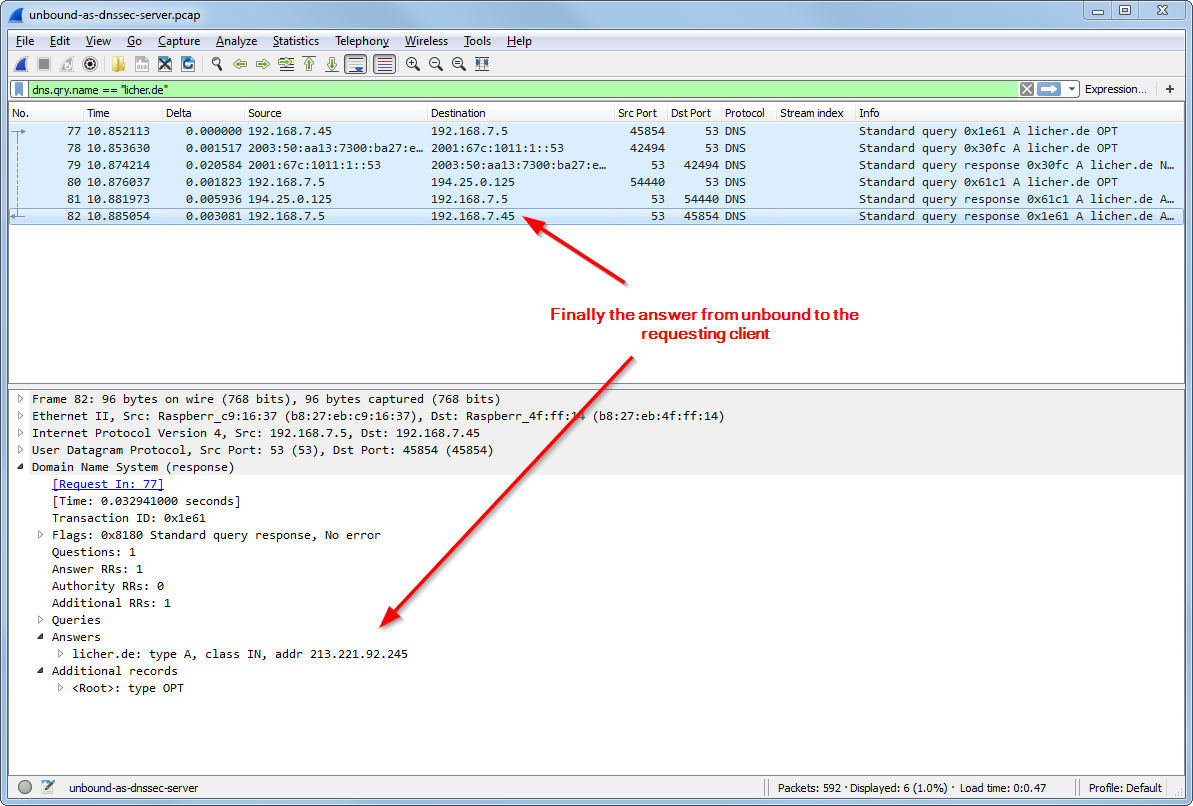
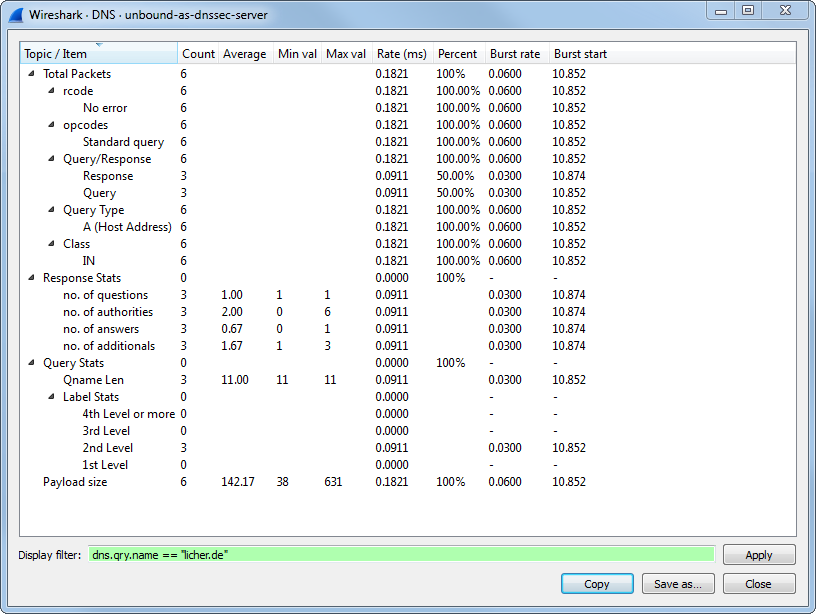
Sample Wireshark Screenshots
This is a small tcpdump capture on the Raspberry Pi, displayed with Wireshark. It shows an iterative (!) lookup of “licher.de” with its initial request from the client to the Raspberry Pi, the iterative lookup and the final answer to the client. Also note the “Statistics -> DNS” summary within Wireshark which can be used for troubleshooting, too:

Conclusion
Now, all DNS answers are DNSSEC validated. Really all DNS answer? Well, actually, no. Only those which are DNSSEC signed. However, we solved the chicken-egg problem and are now able to validate DNSSEC answers.
Featured image “IMG_5691” by Sebastian Grasegger is licensed under CC BY-SA 2.0.
Great stuff.
I’m quite surprised how easy to install and – the first impression – the web response is much faster.
A very good step by step documentation.
The best is, it works.
Thanks for the good description,
Hans-Peter
Thank you very much. Very well done!
Thanks for that .
Do you also have in your logs message like :
info: NSEC3s for the referral proved no DS.
unbound: [7905:0] info: Verified that unsigned response is INSECURE
I have this almost for each dns query .
But when I go there : https://www.rootcanary.org/test.html
it says it’s fine .