
This is a basic tutorial on how to install BIND, the Berkeley Internet Name Domain server, on a Ubuntu server in order to run it as an authoritative DNS server. It differs from other tutorials because I am using three servers (one as a hidden primary and two secondaries as the publicly accessible ones), as well as some security such as denying recursive lookups and public zone transfers, as well as using TSIG for authenticating internal zone transfers. That is, this post is not an absolute beginner’s guide.
The basic environment looks like that. Note that I am showing my real IP addresses, private and public ones. Don’t be confused about that and change them to your IPs accordingly:


Some notes about the installation of the servers:
- My domain for these test servers is weberdns.de.
- The main motivation for the hidden primary approach comes from DNSSEC (see other posts), in which I am managing the keys only on the hidden primary but not on the secondaries. No single access is possible from the public Internet to this primary server.
- However, note that the Start-of-Authority (SOA) record lists this ns0.weberdns.de server though, while the NS records only list the two secondary name servers ns1.weberdns.de and ns2.weberdns.de.
- I am using only the private IPv4 or global IPv6 addresses through site-to-site VPN tunnels in order to transfer the zones between the DNS servers. This brings encryption when traversing the Internet, as well as appropriate security policies on the intermediate firewalls.
- By default, each server sends notifications to all other NS servers in case of a zone change. In my case, the notifications are set to “explicit” to only notify the private IPv4 addresses specified in the zone configuration “also-notify { };” and not the public ones.
- TSIG is used to authenticate the zone transfers (even though not really mandatory since I am using VPN tunnels anyway). For each secondary, I am using a unique key.
- Public zone transfers (AXFR) are disabled globally. Only servers that authenticated with their key within the “allow-transfer { };” statement are allowed to transfer the zone.
- Per-zone statistics are enabled on all servers.
- I am using Ubuntu servers version 14.04 LTS either on VMs or on hardware. Of course, they have static (NATted) IPv4 and IPv6 addresses. The bind9 package from Ubuntu at the time of writing is version 9.9.5-3ubuntu0.8-Ubuntu (June 2016).
- Throughout my blogposts, I am using the terms “primary/secondary” rather than “master/slave” in order to omit the outdated slavery here. However, inside the BIND config they are still called master and slave.
BIND Installation
To install the BIND package simply use the following two statements:
|
1 2 |
sudo apt-get update sudo apt-get install bind9 |
All configuration files are stored in the folder /etc/bind/ .
The started process is called “named“. It listens on udp and tcp port 53, each for IPv4 and IPv6:
|
1 2 3 4 5 6 7 8 9 |
weberjoh@jw-vm07-ns1:~$ sudo netstat -tulpen | grep named tcp 0 0 192.168.110.25:53 0.0.0.0:* LISTEN 106 480821 4703/named tcp 0 0 127.0.0.1:53 0.0.0.0:* LISTEN 106 480819 4703/named tcp 0 0 127.0.0.1:953 0.0.0.0:* LISTEN 106 480822 4703/named tcp6 0 0 :::53 :::* LISTEN 106 480814 4703/named tcp6 0 0 ::1:953 :::* LISTEN 106 480823 4703/named udp 0 0 192.168.110.25:53 0.0.0.0:* 106 480820 4703/named udp 0 0 127.0.0.1:53 0.0.0.0:* 106 480818 4703/named udp6 0 0 :::53 :::* 106 480813 4703/named |
To view syslog messages, grep for the “named” process:
|
1 |
tail -f /var/log/syslog | grep named |
Primary (Master)
The primary server is the one on which the zone files are maintained. At first, some options are set to secure the authoritative server. These are set within the named.conf.options file (in the /etc/bind/ folder).
|
1 |
sudo nano named.conf.options |
Add the following options:
|
1 2 3 4 5 6 7 8 9 10 11 |
// per zone statistics zone-statistics yes; // no recursion at all recursion no; // no transfer afxr by default allow-transfer { "none"; }; // explicit NOTIFY to also-notify statements only notify explicit; |
Then, add a zone statement inside the named.conf.local file:
|
1 |
sudo nano named.conf.local |
In my case a zone weberdns.de of type master. The allow-transfer statement lists the two secondary servers that should be able to transfer the zone. Similarly, the also-notify statement lists the secondaries, too, in order to notify them in case of a zone update.
|
1 2 3 4 5 6 |
zone "weberdns.de" { type master; file "/etc/bind/db.weberdns.de"; allow-transfer { 2003:51:6012:110::a07:53; 192.168.90.10; }; also-notify { 2003:51:6012:110::a07:53; 192.168.90.10; }; }; |
Finally, the zone file must be created. I am using the template from Hetzner. All relevant statements are already explained there, so I won’t repeat them here.
|
1 |
sudo nano db.weberdns.de |
This is my basic zone file. The SOA record starts with “ns0.weberdns.de”. There are two NS records (ns1. and ns2.) for this domain, as well as an MX record. Some examples of A, AAAA, CNAME, and TXT records are also shown. And remember to increment the serial number after each modification of the zone file! ;)
|
1 2 3 4 5 6 7 8 9 10 11 12 13 14 15 16 17 18 19 20 21 22 23 24 25 26 27 |
; ; BIND data file for weberdns.de ; $TTL 1h @ IN SOA ns0.weberdns.de. webmaster.webernetz.net. ( 2016051804 ; Serial 1h ; Refresh 15m ; Retry 4w ; Expire 3m ) ; Negative Cache TTL ; @ IN NS ns1.weberdns.de. @ IN NS ns2.weberdns.de. @ IN MX 10 mail.weberdns.de. fg IN A 80.154.108.233 IN AAAA 2003:51:6012::4 ip IN CNAME ip.webernetz.net. mail IN A 80.154.108.237 IN AAAA 2003:51:6012:110::15 ns1 IN A 80.154.108.230 IN AAAA 2003:51:6012:110::a07:53 ns2 IN A 213.61.29.182 pa IN A 80.154.108.228 IN AAAA 2003:51:6012::2 txt IN TXT "This is a text." www IN CNAME weberblog.net. |
After these steps, the BIND server must be restarted for all changes to work:
|
1 |
sudo service bind9 restart |
A check of the configuration can be done with named-checkconf -z . If no errors occur, everything works fine.
For updates of the zone file, a reload of BIND fits. No restart is required. The reload can be triggered by either one of these two commands:
|
1 2 |
sudo service bind9 reload sudo rndc reload |
A basic test can be done with the dig tool, such as:
|
1 2 3 4 5 6 7 8 9 10 11 12 13 14 15 16 17 18 19 20 21 22 23 24 25 26 27 28 29 30 31 |
weberjoh@jw-vm16-ns0:/etc/bind$ dig @localhost fg.weberdns.de ; <<>> DiG 9.9.5-3ubuntu0.8-Ubuntu <<>> @localhost fg.weberdns.de ; (2 servers found) ;; global options: +cmd ;; Got answer: ;; ->>HEADER<<- opcode: QUERY, status: NOERROR, id: 44847 ;; flags: qr aa rd; QUERY: 1, ANSWER: 1, AUTHORITY: 2, ADDITIONAL: 4 ;; WARNING: recursion requested but not available ;; OPT PSEUDOSECTION: ; EDNS: version: 0, flags:; udp: 4096 ;; QUESTION SECTION: ;fg.weberdns.de. IN A ;; ANSWER SECTION: fg.weberdns.de. 3600 IN A 80.154.108.233 ;; AUTHORITY SECTION: weberdns.de. 3600 IN NS ns2.weberdns.de. weberdns.de. 3600 IN NS ns1.weberdns.de. ;; ADDITIONAL SECTION: ns1.weberdns.de. 3600 IN A 80.154.108.230 ns1.weberdns.de. 3600 IN AAAA 2003:51:6012:110::a07:53 ns2.weberdns.de. 3600 IN A 213.61.29.182 ;; Query time: 3 msec ;; SERVER: ::1#53(::1) ;; WHEN: Wed May 18 16:02:11 CEST 2016 ;; MSG SIZE rcvd: 155 |
Note the “aa” flag in line 8 which indicates that this is an “authoritative answer”.
To view the statistics, run sudo rndc stats to dump the stats into the following file: cat /var/cache/bind/named.stats . The new statistics are always appended to this file and are listed between the following strings, while the number in brackets is the unixtime:
|
1 2 3 |
+++ Statistics Dump +++ (1471872885) [...] --- Statistics Dump --- (1471872885) |
Great so far. ;)

Secondary
The two secondary servers are installed in the same way as the primary. The additional options should be the following ( sudo nano named.conf.options ):
|
1 2 3 4 5 6 7 8 9 10 11 |
// per zone statistics zone-statistics yes; // no recursion at all recursion no; // no transfer afxr by default allow-transfer { "none"; }; // no NOTIFY to NS RRs notify no; |
Note that it is REALLY crucial to put in these lines, at least the “allow-transfer none” one. Otherwise, the zone is fully loadable through an axfr request. (A painful mistake is to only place this statement at the hidden primary but to forget it on the secondary units.)
Now, the only portion to configure to be a secondary is inside the named.conf.local file.
|
1 |
sudo nano named.conf.local |
In my case, it only lists the following lines:
|
1 2 3 4 5 |
zone "weberdns.de" { type slave; file "db.weberdns.de"; masters { 192.168.120.21; }; }; |
After a restart of the service ( sudo service bind9 restart ), everything is ready. Asking the localhost should work, e.g.: dig @localhost mail.weberdns.de .
The resource records are stored in the following path: /var/cache/bind/. Note that these files are not readable, but can be converted into a textfile with:
|
1 |
named-compilezone -f raw -j -F text -o ~/db.weberdns.de.txt weberdns.de /var/cache/bind/db.weberdns.de |
This reads the raw database (-f raw) and includes the journal file (-j). It outputs text (-F text) into the file (-o outputfilename). With cat db.weberdns.de.txt you can see your RRs.
Parent Zone: Glue Records
To become the authoritative servers, the names and/or IP addresses of the nameservers must be configured at the parent zone, in my case the DENIC which is responsible for *.de. They offer a good online check for domain servers (Nameserver Predelegation Check Web Interface) which tests the nameservers to see if everything is accessible (firewalls with udp/tcp port 53) and configured correctly (SOA record values, …). In my case, this looks like this:

Since my NS servers for “weberdns.de” are called “ns1.weberdns.de” and “ns2.weberdns.de”, (which won’t be resolvable if only these FQDNs are known), the entries for these nameservers are stored with their glue records, i.e., the name and the IP addresses.
After this step was done, a whois for weberdns.de looks like:
|
1 2 3 4 5 6 7 |
weberjoh@jw-nb12:~$ whois weberdns.de Domain: weberdns.de Nserver: ns1.weberdns.de 2003:51:6012:110:0:0:a07:53 80.154.108.230 Nserver: ns2.weberdns.de 213.61.29.182 Status: connect Changed: 2016-05-17T17:01:42+02:00 |
The Internet is now able to ask my two secondary name servers for everything ending with .weberdns.de. Great again. This can easily be tested with dig +trace from any machine that has Internet access, e.g.:
|
1 |
dig www.weberdns.de +trace |
Zone Transfers
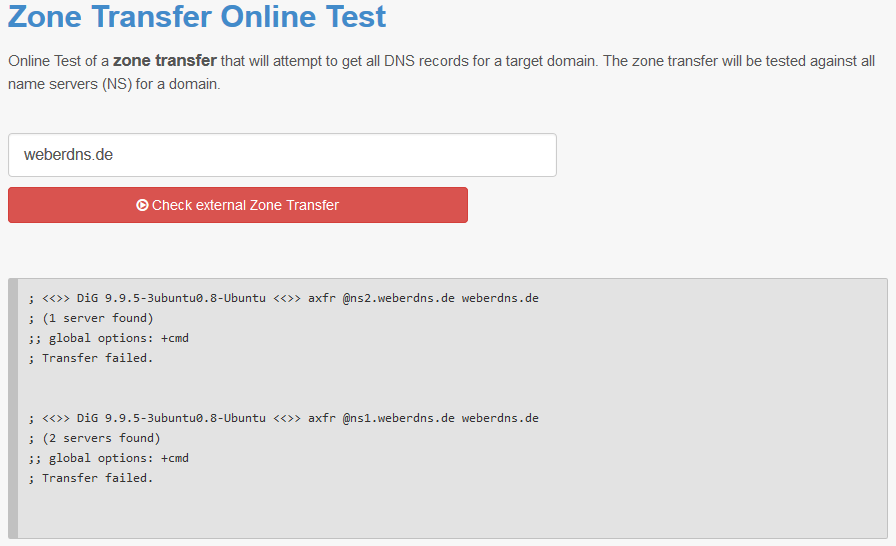
At first, it is crucial to test that zone transfers of your servers are not available from the Internet. The Zone Transfer Online Test can be used for this purpose. This should fail because the “allow-transfer” options are already configured for both server types, primary and secondary. Here is a sample of my domain:
Dig can be used to test the zone transfers, too, such as:
|
1 |
dig @ns1.weberdns.de weberdns.de axfr |
Of course, this command will/must work if it is issued from one of the secondaries and directed to the primary, in my case:
|
1 |
dig @192.168.120.21 weberdns.de axfr |
To authenticate the zone transfers, TSIG can be used. (This won’t be needed in my case, because I am already using private site-to-site VPNs for the connections between my servers. However. ;)) With TSIG, a shared secret is configured on any server pair (primary to secondary1, and primary to secondary2). Only if this “password” is present, the secondary is able to transfer the zone. Note that this is not encryption (confidentiality), but only authentication.
At first, the keys must be generated. Note the last option which is the key-name, in this example case “key-ns1”:
|
1 |
dnssec-keygen -r /dev/urandom -a HMAC-SHA256 -b 256 -n HOST key-ns1 |
I am using two different keys for both secondary servers. That is, I generated the following keys. Note that the key values in both files (*.key and *.private) are the same keys. (And no, these are not my actual keys, but only demos):
|
1 2 3 4 5 6 7 8 9 10 11 12 13 14 15 16 17 18 19 20 21 22 23 24 25 26 27 |
weberjoh@jw-nb12:~/temp$ dnssec-keygen -r /dev/urandom -a HMAC-SHA256 -b 256 -n HOST key-ns1 Kkey-ns1.+163+21468 weberjoh@jw-nb12:~/temp$ ls Kkey-ns1.+163+21468.key Kkey-ns1.+163+21468.private weberjoh@jw-nb12:~/temp$ cat Kkey-ns1.+163+21468.key key-ns1. IN KEY 512 3 163 32r25Nl7WKMw4AU0QSNC67NHsxE0ZNeJ+POe624fE2E= weberjoh@jw-nb12:~/temp$ cat Kkey-ns1.+163+21468.private Private-key-format: v1.3 Algorithm: 163 (HMAC_SHA256) Key: 32r25Nl7WKMw4AU0QSNC67NHsxE0ZNeJ+POe624fE2E= Bits: AAA= Created: 20160519071805 Publish: 20160519071805 Activate: 20160519071805 weberjoh@jw-nb12:~/temp$ dnssec-keygen -r /dev/urandom -a HMAC-SHA256 -b 256 -n HOST key-ns2 Kkey-ns2.+163+35812 weberjoh@jw-nb12:~/temp$ cat Kkey-ns2.+163+35812.key key-ns2. IN KEY 512 3 163 QZlvozBRA1dGQ2DlIRh90X7kryXjihuDntrl9hEjmD0= weberjoh@jw-nb12:~/temp$ cat Kkey-ns2.+163+35812.private Private-key-format: v1.3 Algorithm: 163 (HMAC_SHA256) Key: QZlvozBRA1dGQ2DlIRh90X7kryXjihuDntrl9hEjmD0= Bits: AAA= Created: 20160519071831 Publish: 20160519071831 Activate: 20160519071831 |
On the primary server, open the named.conf file and add both keys one for each secondary, such as:
|
1 2 3 4 5 6 7 8 9 |
key key-ns1 { algorithm hmac-sha256; secret "32r25Nl7WKMw4AU0QSNC67NHsxE0ZNeJ+POe624fE2E="; }; key key-ns2 { algorithm hmac-sha256; secret "QZlvozBRA1dGQ2DlIRh90X7kryXjihuDntrl9hEjmD0="; }; |
Furthermore, open the named.conf.local and change the “allow-transfer” statement to only allow connections with these keys. The IP addresses from the servers must be omitted, for example, comment them out. Otherwise, connections from these IP addresses will still be possible without the key:
|
1 2 |
// allow-transfer { 2003:51:6012:110::a07:53; 192.168.90.10; }; allow-transfer { key key-ns1; key key-ns2; }; |
Same procedure on both secondaries, of course only with the single needed key, e.g., key-ns1 and key-ns2. Furthermore, the “server” statement must be configured. Open the named.conf on the first secondary, ns1, and add these lines:
|
1 2 3 4 5 6 7 8 |
key key-ns1 { algorithm hmac-sha256; secret "32r25Nl7WKMw4AU0QSNC67NHsxE0ZNeJ+POe624fE2E="; }; server 2003:51:6012:120::a16:53 { keys { key-ns1; }; }; |
And similarly on ns2:
|
1 2 3 4 5 6 7 8 |
key key-ns2 { algorithm hmac-sha256; secret "QZlvozBRA1dGQ2DlIRh90X7kryXjihuDntrl9hEjmD0="; }; server 192.168.120.21 { keys { key-ns2; }; }; |
Now, restart all bind services sudo service bind9 restart and you’re done.
A dig test w/o the key will not work anymore:
|
1 2 3 4 5 6 |
weberjoh@jw-vm07-ns1:~$ dig @192.168.120.21 weberdns.de axfr ; <<>> DiG 9.9.5-3ubuntu0.8-Ubuntu <<>> @192.168.120.21 weberdns.de axfr ; (1 server found) ;; global options: +cmd ; Transfer failed. |
But with the key (-y option), the zone transfer works again:
|
1 2 3 4 5 6 7 8 9 10 |
weberjoh@jw-vm07-ns1:~$ dig @192.168.120.21 -y hmac-sha256:key-ns1:32r25Nl7WKMw4AU0QSNC67NHsxE0ZNeJ+POe624fE2E= weberdns.de axfr ; <<>> DiG 9.9.5-3ubuntu0.8-Ubuntu <<>> @192.168.120.21 -y hmac-sha256 weberdns.de axfr ; (1 server found) ;; global options: +cmd weberdns.de. 3600 IN SOA ns0.weberdns.de. webmaster.webernetz.net. 2016051804 14400 1800 604800 180 weberdns.de. 3600 IN NS ns1.weberdns.de. weberdns.de. 3600 IN NS ns2.weberdns.de. weberdns.de. 3600 IN MX 10 mail.weberdns.de. [...] |
Note the different syslog messages (captured on the secondary) for the following three scenarios:
|
1 2 3 4 5 6 7 8 9 10 11 12 13 14 15 16 17 |
### Syslog Messages notify + zone transfer (w/o TSIG) weberjoh@jw-nb13-ns2:~$ tail -100 /var/log/syslog | grep named May 18 10:15:50 jw-nb13 named[2436]: client 192.168.120.21#55706: received notify for zone 'weberdns.de' May 18 10:15:50 jw-nb13 named[2436]: zone weberdns.de/IN: Transfer started. May 18 10:15:50 jw-nb13 named[2436]: transfer of 'weberdns.de/IN' from 192.168.120.21#53: connected using 192.168.90.10#58932 May 18 10:15:50 jw-nb13 named[2436]: zone weberdns.de/IN: transferred serial 2016051801 May 18 10:15:50 jw-nb13 named[2436]: transfer of 'weberdns.de/IN' from 192.168.120.21#53: Transfer completed: 1 messages, 14 records, 1408 bytes, 0.128 secs (11000 bytes/sec) ### Syslog with TSIG on the master but currently not on the slave May 18 11:14:48 jw-nb13 named[2436]: client 192.168.120.21#22030: request has invalid signature: TSIG key-ns2: tsig verify failure (BADKEY) ### Syslog with TSIG correctly on both, master and slave. Note the "TSIG 'key-ns2'" statements: May 18 11:30:39 jw-nb13 named[2928]: client 192.168.120.21#40015/key key-ns2: received notify for zone 'weberdns.de': TSIG 'key-ns2' May 18 11:30:39 jw-nb13 named[2928]: zone weberdns.de/IN: Transfer started. May 18 11:30:39 jw-nb13 named[2928]: transfer of 'weberdns.de/IN' from 192.168.120.21#53: connected using 192.168.90.10#34207 May 18 11:30:39 jw-nb13 named[2928]: zone weberdns.de/IN: transferred serial 2016051803: TSIG 'key-ns2' May 18 11:30:39 jw-nb13 named[2928]: transfer of 'weberdns.de/IN' from 192.168.120.21#53: Transfer completed: 1 messages, 14 records, 1420 bytes, 0.141 secs (10070 bytes/sec) |

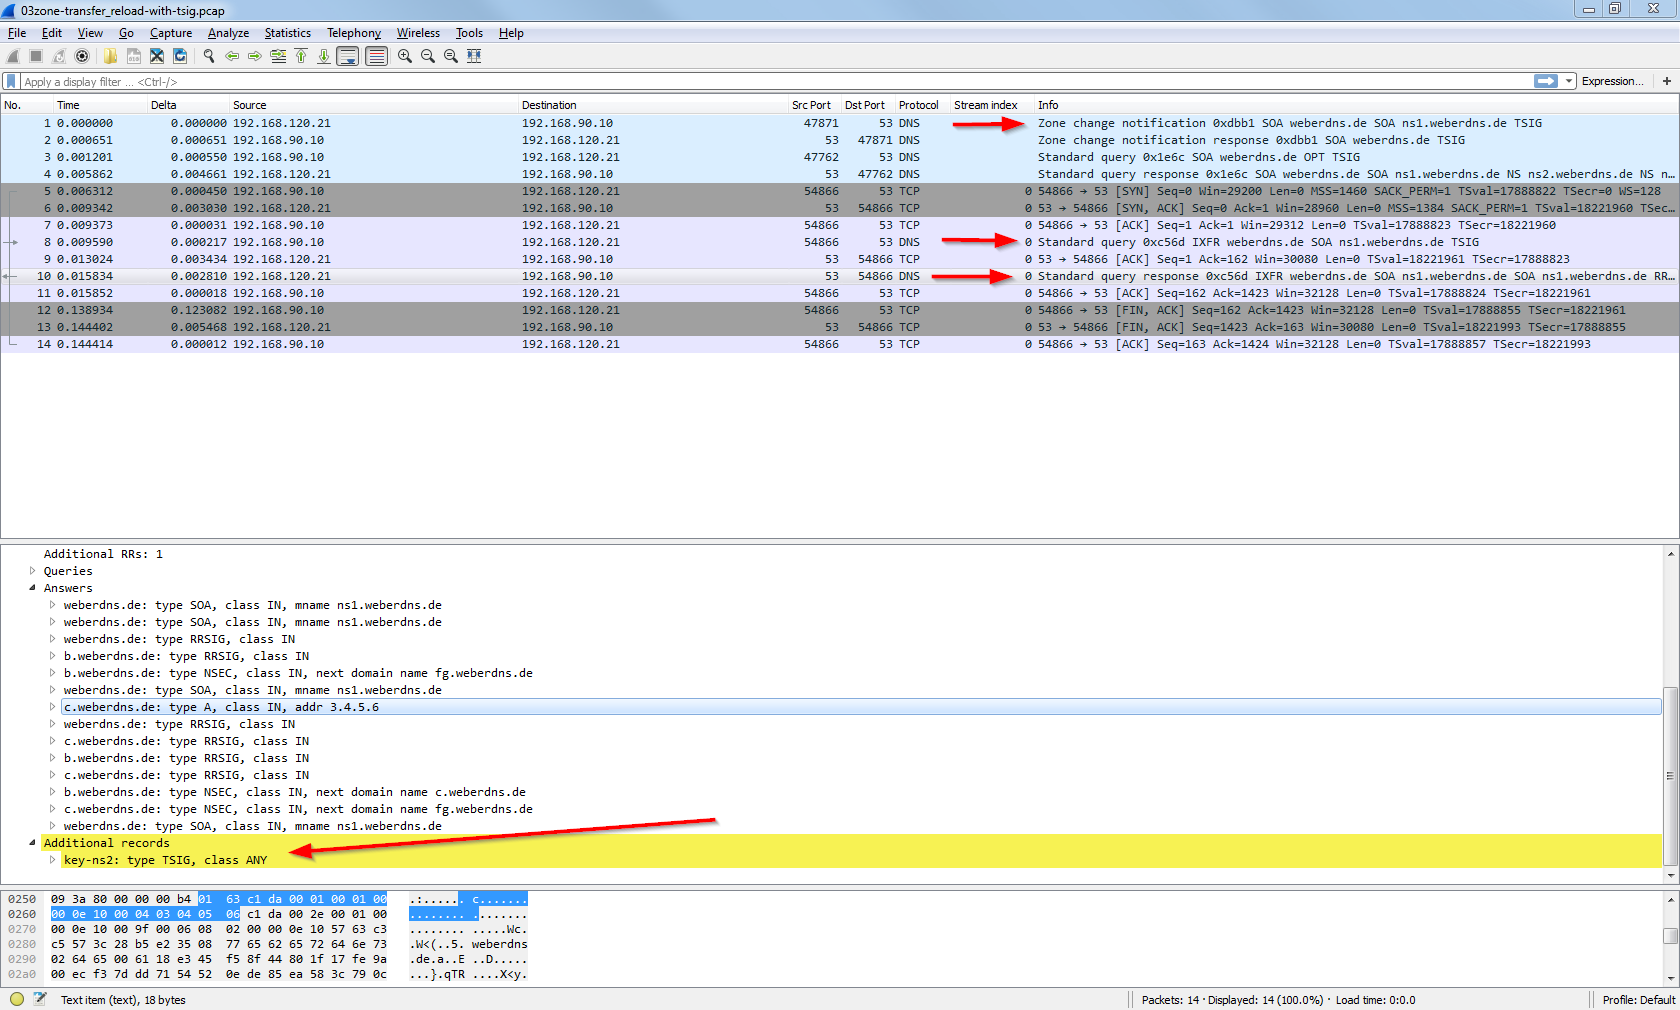
Finally, here are some Wireshark screenshots for different notifications and zone transfers, with and without TSIG. See the descriptions beneath them for more details:


If you want to have a look at the pcaps by yourself, here we go (7zipped, 12 KB):
![]()
That’s it. Hope this helps.
Links
Other BIND tutorials are here or here [DE]. The following links are more specific:
- BIND 9 documentation
- BIND 9 list of statements
- Hetzner Standard Zone File Template
- Zone Transfer Online Test
- Secure Zone transfer in BIND using TSIG (Transaction Signatures)
- (Online) DNSWatch: DNS Lookups & Performance Monitoring
- (Linux) DNS Diagnostics and Performance Measurement Tools
- DENIC Nameserver Predelegation Check Webinterface (NAST)
Featured image “Anna-Amalia-Bibliothek Weimar B” by Fofarama is licensed under CC BY 2.0.