
I am always interested in capturing real values via hardware devices in order to generate the appropriate graphs with my monitoring system. Of course, the outside temperature in our city was at the pole position for such a project. Therefore I ordered a few temperature/humidity sensors from PCsensor (via eBay), plugged them via USB on my Raspberry Pi (Raspbian Linux), and queried them via SNMP from my MRTG/Routers2 monitoring server. Here is the whole story:

Hardware
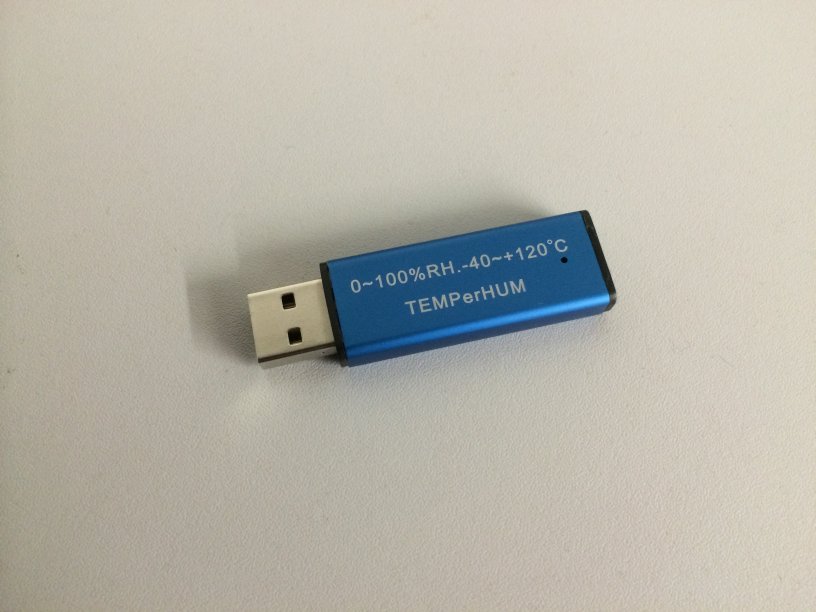
The USB sticks can also be ordered from PCsensor directly. I am using the sensor called “TEMPerHUM” with the USB ID “1130:660c“. (Google is a really good source for finding similar projects using exactly this type of sensor!) It has a built-in temperature and humidity sensor. Here is a photo of the USB stick:
The following messages appeared after plugging the USB device in ( dmesg ):
|
1 2 3 4 5 6 7 |
Oct 16 10:41:25 jw-nb09 kernel: [1793988.148047] usb 2-1: new low-speed USB device number 2 using ohci_hcd Oct 16 10:41:26 jw-nb09 kernel: [1793988.946117] input: PCsensor Temper as /devices/pci0000:00/0000:00:1c.0/usb2/2-1/2-1:1.0/input/input5 Oct 16 10:41:26 jw-nb09 kernel: [1793988.946555] generic-usb 0003:1130:660C.0001: input,hidraw0: USB HID v1.10 Keyboard [ PCsensor Temper] on usb-0000:00:1c.0-1/input0 Oct 16 10:41:26 jw-nb09 kernel: [1793988.977273] input: PCsensor Temper as /devices/pci0000:00/0000:00:1c.0/usb2/2-1/2-1:1.1/input/input6 Oct 16 10:41:26 jw-nb09 kernel: [1793988.977777] generic-usb 0003:1130:660C.0002: input,hidraw1: USB HID v1.10 Device [ PCsensor Temper] on usb-0000:00:1c.0-1/input1 Oct 16 10:41:26 jw-nb09 kernel: [1793988.977829] usbcore: registered new interface driver usbhid Oct 16 10:41:26 jw-nb09 kernel: [1793988.977834] usbhid: USB HID core driver |
With lsusb the following “Foot Pedal/Thermometer” appeared:
|
1 |
Bus 001 Device 005: ID 1130:660c Tenx Technology, Inc. Foot Pedal/Thermometer |
Driver etc.
After quite a few tests with different drivers for this sensor I found a working one, called HID-TEMPerHUM. It needs “libusb-dev” as a prerequisite:
|
1 |
sudo apt-get install libusb-dev |
After a download of the HID-TEMPerHUM driver ( git clone https://github.com/jeixav/HID-TEMPerHUM ) and a cd into the directory ( cd HID-TEMPerHUM/ ) it must be built with make , made executable with sudo chmod u+x temper and should be moved to the following folder: sudo mv temper /usr/local/bin/. The driver needs root privileges. An example call looks like that:
|
1 2 |
pi@jw-pi01 ~ $ sudo temper 8.50 67.45 |
The first value is the temperature while the second one is the humidity.
Two improvements of this procedure are: Change the ownership of the program with sudo chown root /usr/local/bin/temper and set the setuid bit so that every user can run this executable with the rights of the owner: sudo chmod +s /usr/local/bin/temper .
So, the first steps are done. Great. ;)

Script for MRTG
However, I wanted to query the values via SNMP from my MRTG/Routers2 installation. At first this required a small change in the output of the “temper” program. I wrote a small script called “temperMRTG.sh” which calls the original temper program, but displays the two values without a dot on two distinct lines. This is my script:
|
1 2 3 4 5 6 |
#!/bin/bash /usr/local/bin/temper | sed s/[.]//g | tr [:space:] \\n #echo "Line3" #echo "Line4" |
Make it executable with chmod u+x temperMRTG.sh and move it to the same folder as the mere temper program: sudo mv temperMRTG.sh /usr/local/bin/ . A call now looks like that:
|
1 2 3 |
pi@jw-pi01 ~ $ temperMRTG.sh 876 6718 |
Querying the Sensor via SNMP
(Not exactly true: You are querying the Raspberry Pi on which the USB sensor is plugged in.) The final step is to add the script in the snmpd.conf file to make it accessible via SNMP. (For further information about the SNMP daemon, use my post about adding a Linux host to MRTG.) Open the snmpd.conf file sudo nano /etc/snmp/snmpd.conf and add the following line under the “EXTENDING THE AGENT” section:
|
1 |
extend-sh temperature /bin/sh /usr/local/bin/temperMRTG.sh |
A restart of the snmpd is required: sudo /etc/init.d/snmpd restart. Now “walk the NET-SNMP-EXTEND-MIB tables […] to see the resulting output”, as it is said in the snmpd.conf. Like every time, I am using the iReasoning MIB Browser for this job. This quickly revealed the following OIDs:
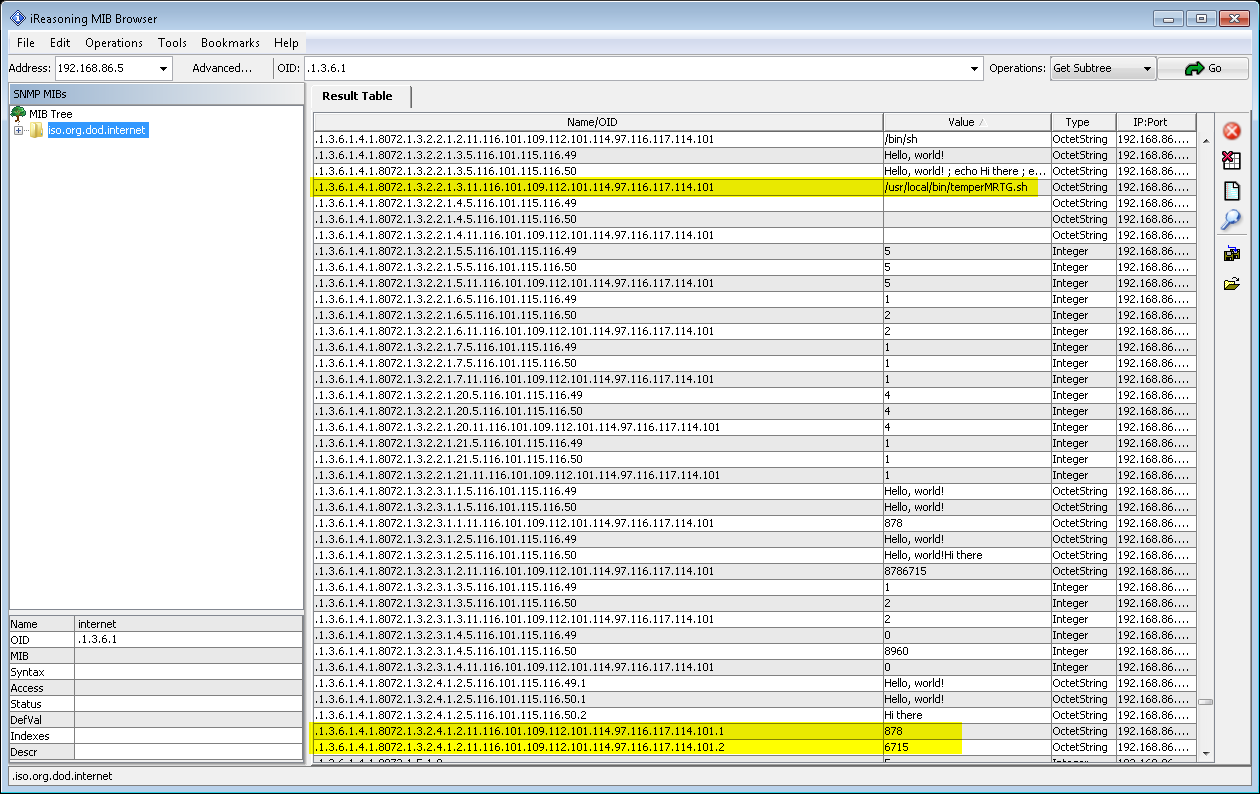
MRTG/Routers2 Configuration
Finally, here is my MRTG/Routers2 configuration for this sensor. It queries the two OIDs that I found on the above step with the MIB browser. Note that these OIDs might be different on your system! Also note the “/100” at the very end of the first line which shifts the comma for the values two times to the left. I am using a graph with two y-axis, one on the left (temperature) and one on the right (humidity). Refer to the sample screenshots at the end of this post for a better understanding.
|
1 2 3 4 5 6 7 8 9 10 11 12 13 14 15 16 17 18 19 20 21 22 23 24 25 26 27 28 |
Target[temperature_fdorf-outside]: 1.3.6.1.4.1.8072.1.3.2.4.1.2.11.116.101.109.112.101.114.97.116.117.114.101.1&1.3.6.1.4.1.8072.1.3.2.4.1.2.11.116.101.109.112.101.114.97.116.117.114.101.2:pA7EHRaKQZfm@192.168.86.5:::::2 /100 MaxBytes[temperature_fdorf-outside]: 100 #Since my USB device sometimes reports humidity values greater 100, I am using the AbsMax value here: AbsMax[temperature_fdorf-outside]: 120 Title[temperature_fdorf-outside]: Temperature & Relative Humidity -- Fdorf Outside Options[temperature_fdorf-outside]: gauge #for only printing the Peak Value on the yearly-graph WithPeak[temperature_fdorf-outside]: y Colours[temperature_fdorf-outside]: Red#FF0000, Blue#0000FF, Darkred#800000, Purple#FF00FF YLegend[temperature_fdorf-outside]: Temperature °C Legend1[temperature_fdorf-outside]: Temperature Legend2[temperature_fdorf-outside]: Rel. Humidity Legend3[temperature_fdorf-outside]: Peak Rel. Temperature Legend4[temperature_fdorf-outside]: Peak Humidity LegendI[temperature_fdorf-outside]: Temperature: LegendO[temperature_fdorf-outside]: Rel. Humidity: ShortLegend[temperature_fdorf-outside]: °C routers.cgi*Options[temperature_fdorf-outside]: fixunit nomax nopercentile nototal #routers.cgi*GraphStyle[temperature_fdorf-outside]: lines routers.cgi*ShortDesc[temperature_fdorf-outside]: Fdorf Outside routers.cgi*ShortLegend2[temperature_fdorf-outside]: % routers.cgi*YLegend2[temperature_fdorf-outside]: Relative Humidity % routers.cgi*ScaleShift[temperature_fdorf-outside]: 2 #routers.cgi*UpperLimit[temperature_fdorf-outside]: 30 #This one does not work with negative values: #routers.cgi*LowerLimit[temperature_fdorf-outside]: -10 #And this one does not exist at all :( The workaround is to use ScaleShift #routers.cgi*UpperLimit2[temperature_fdorf-outside]: 100 |
Changing the RRD Files
In order to store negative values (which is not common an a mere MRTG installation since it only reports positive traffic through routers/switches and not negative temperature values), the RRD files of the temperature must be adjusted a bit. The program rrdtune does that. At first, move to the folder in which all RRD files are stored. In my case, this is “/var/mrtg/”. Locate the correct *.rrd file and read out the file with:
|
1 |
rrdtool info temperature_fdorf-outside.rrd |
The interesting line looks like that:
|
1 |
ds[ds0].min = 0.0000000000e+00 |
To have a minimum value of “-100” stored, the rrd must be changed with root privileges such as:
|
1 |
sudo rrdtool tune temperature_fdorf-outside.rrd --minimum ds0:-100 |
After that when doing an “info” on more time, the line should look like that:
|
1 |
ds[ds0].min = -1.0000000000e+02 |
DONE!!! ;)
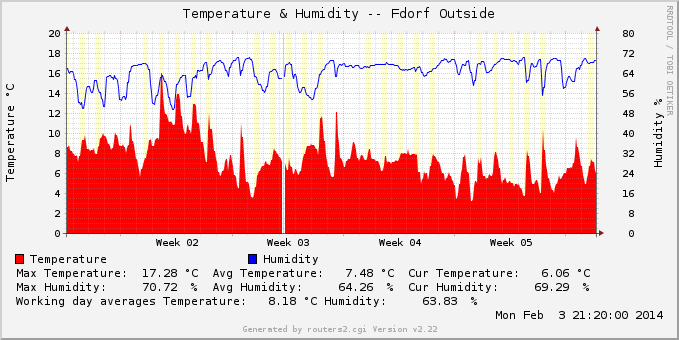
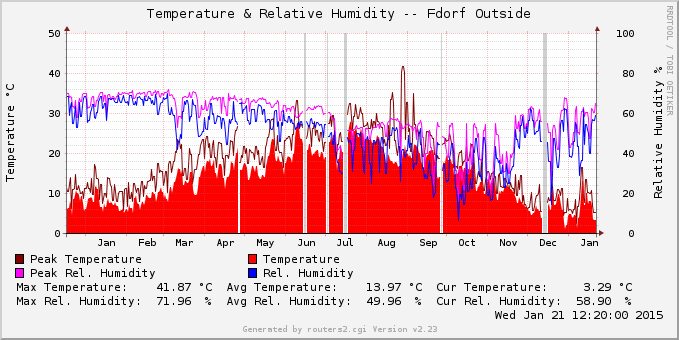
Sample Screenshots
Since the temperature was not that interesting in Germany during the last few weeks, these graphs look quite boring, i.e., no negative temperatures, or the like. However, here we go:


By the way, this is the sensor on the outside at our balcony:

Though it is not meant to be used outside a building, I have not encountered any problems with this USB sensor. Of course, it is placed under a small roof and therefore protected from direct rain and weather, which has the disadvantage that the measured temperature is a little bit different from the real temperature due to the window near to the sensor.

Links
- A similar project using perl: TEMPer Sensor temperature graphing and monitoring with MRTG. It uses this perl driver: HidTEMPer
- Linux Journal using the same perl driver: Hack and / – Temper Temper
- Newer driver for Linux: TEMPered
- (German) Linux Magazin: Perl-Skript misst und bewertet Temperaturen
Featured image “40° im Schatten 346/365” by Dennis Skley is licensed under CC BY-ND 2.0.
Hi Johannes,
I have a question in Driver etc. I already downloaded the HID-TEMPerHUM. How build with make? Im using RaspberryPi and new to linux :)
Hi Paolo,
have you downloaded the driver via git? You need to install git before you can download a software through it. (sudo apt-get install git).
When you have downloaded it, go into that folder (cd HID-TEMPerHUM) and simply type “make” in it. Then follow the other steps on my blog post. It should work then. ;)
However, when you are new to Linux it will take some more time to install a monitoring server in order to generated graphs for your temperature values…
Finally a simply explained version! Thanks!
I will use it with Zabbix ;)
tried it a few times on a raspberry pi b, with an uptodate raspbian.
followed your tutorial by the letter, but keep gettin ” TemperCreate: Inappropriate ioctl for device” after [sudo temper].
any idea what i’m doing wrong?
Hi Eric,
I am sorry, but I have no concrete idea. The only thing I discovered was that the company behind the TEMPER sensors offers several different devices which need different programs to read them out. Maybe you have a slightly different one?
Hi there,
Have you successfully obtained negative readings yet?
I am having issues where negative temperatures, when retrieved via SNMP are converted incorrectly:
Example: -2.5 deg C is being displayed as 4294967294
I have read that this may because the Guage32 value can’t support negative numbers, however I have no idea how to fix it.
Since you are hopefully measuring negative temperatures, I was wondering how you managed to solve the issue?
Thanks,
Nathan
Hi Nathan,
have you already done the “Changing the RRD Files” part of my tutorial? For me, this works perfect.
Hello, i’m getting this error on build
root@raspberrypi:~/HID-TEMPerHUM# make
cc -DUNIT_TEST -o temper temper.c temper.h -lusb
temper.c:3:17: fatal error: usb.h: No such file or directory
#include
^
compilation terminated.
Makefile:6: recipe for target ‘temper’ failed
make: *** [temper] Error 1
Thank you for the simple tutorial! I’ve run into problems installing the driver successfully, and since I am a n00b I thought coming here for help might prove fruitful.
When it comes to cloning the directory using git clone, it says there’s already a non-empty directory there. Alright, then. When I move to the HID-TEMPerHUM directory, and type ‘make’, it replies that nothing can be done for all.
What does that mean?
check out this script for TEMPer Gold device to automate email alerts for a ser ver room temperature.
http://linuxusbthermometer.com/
Thank you, It is a very nice blog and very interesting information provided.
@mecoinst